五、框架实战:SSM整合原理和实战 目录
一、SSM整合理解 1.1 什么是SSM整合? 微观 :将学习的Spring SpringMVC Mybatis框架应用到项目中!
SpringMVC框架负责控制层
Spring 框架负责整体和业务层的声明式事务管理
MyBatis框架负责数据库访问层
宏观 :Spring接管一切(将框架核心组件交给Spring进行IoC管理),代码更加简洁。
SpringMVC管理表述层、SpringMVC相关组件
Spring管理业务层、持久层、以及数据库相关(DataSource,MyBatis)的组件
使用IoC的方式管理一切所需组件
实施 :通过编写配置文件,实现SpringIoC容器接管一切组件。
1.2 SSM整合核心问题明确 1.2.1 第一问:SSM整合需要几个IoC容器? 两个容器
本质上说,整合就是将三层架构和框架核心API组件交给SpringIoC容器管理!
一个容器可能就够了,但是我们常见的操作是创建两个IoC容器(web容器和root容器),组件分类管理!
这种做法有以下好处和目的:
分离关注点:通过初始化两个容器,可以将各个层次的关注点进行分离。这种分离使得各个层次的组件能够更好地聚焦于各自的责任和功能。
解耦合:各个层次组件分离装配不同的IoC容器,这样可以进行解耦。这种解耦合使得各个模块可以独立操作和测试,提高了代码的可维护性和可测试性。
灵活配置:通过使用两个容器,可以为每个容器提供各自的配置,以满足不同层次和组件的特定需求。每个配置文件也更加清晰和灵活。
总的来说,初始化两个容器在SSM整合中可以实现关注点分离、解耦合、灵活配置等好处。它们各自负责不同的层次和功能,并通过合适的集成方式协同工作,提供一个高效、可维护和可扩展的应用程序架构!
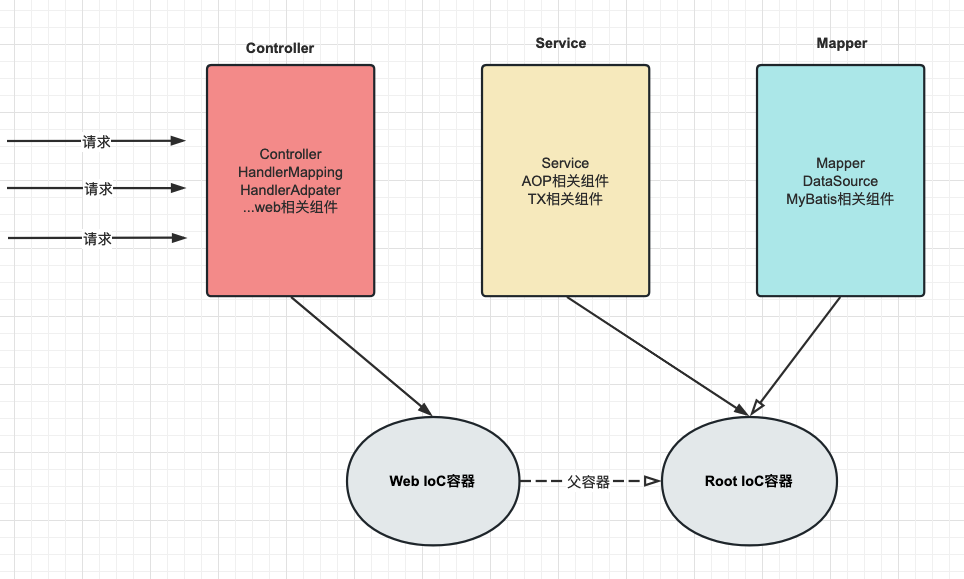
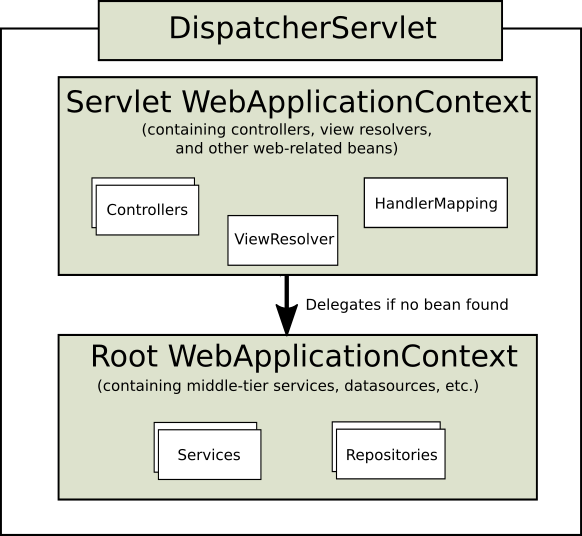
1.2.2 第二问:每个IoC容器对应哪些类型组件? 图解:
总结:
容器名
盛放组件
web容器
web相关组件(controller,springmvc核心组件)
root容器
业务和持久层相关组件(service,aop,tx,dataSource,mybatis,mapper等)
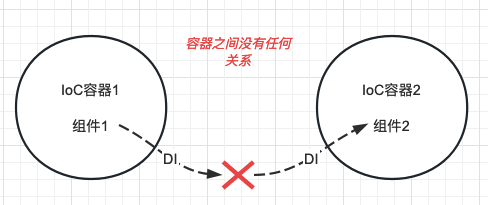
1.2.3 第三问:IoC容器之间关系和调用方向? 情况1:两个无关联IoC容器之间的组件无法注入!
情况2:子IoC容器可以单向的注入父IoC容器的组件!
结论:web容器是root容器的子容器,父子容器关系。
父容器:root容器,盛放service、mapper、mybatis等相关组件
子容器:web容器,盛放controller、web相关组件
源码体现:
FrameworkServlet 655行!
1
2
3
4
5
6
7
8
9
10
11
12
13
14
15
16
17
18
19
20
21
22
23
24
protected WebApplicationContext createWebApplicationContext (@Nullable ApplicationContext parent) { Class<?> contextClass = getContextClass(); if (!ConfigurableWebApplicationContext.class.isAssignableFrom(contextClass)) { throw new ApplicationContextException ( "Fatal initialization error in servlet with name '" + getServletName() + "': custom WebApplicationContext class [" + contextClass.getName() + "] is not of type ConfigurableWebApplicationContext" ); } ConfigurableWebApplicationContext wac = (ConfigurableWebApplicationContext) BeanUtils.instantiateClass(contextClass); wac.setEnvironment(getEnvironment()); wac.setParent(parent); String configLocation = getContextConfigLocation(); if (configLocation != null ) { wac.setConfigLocation(configLocation); } configureAndRefreshWebApplicationContext(wac); return wac; }
调用流程图解:
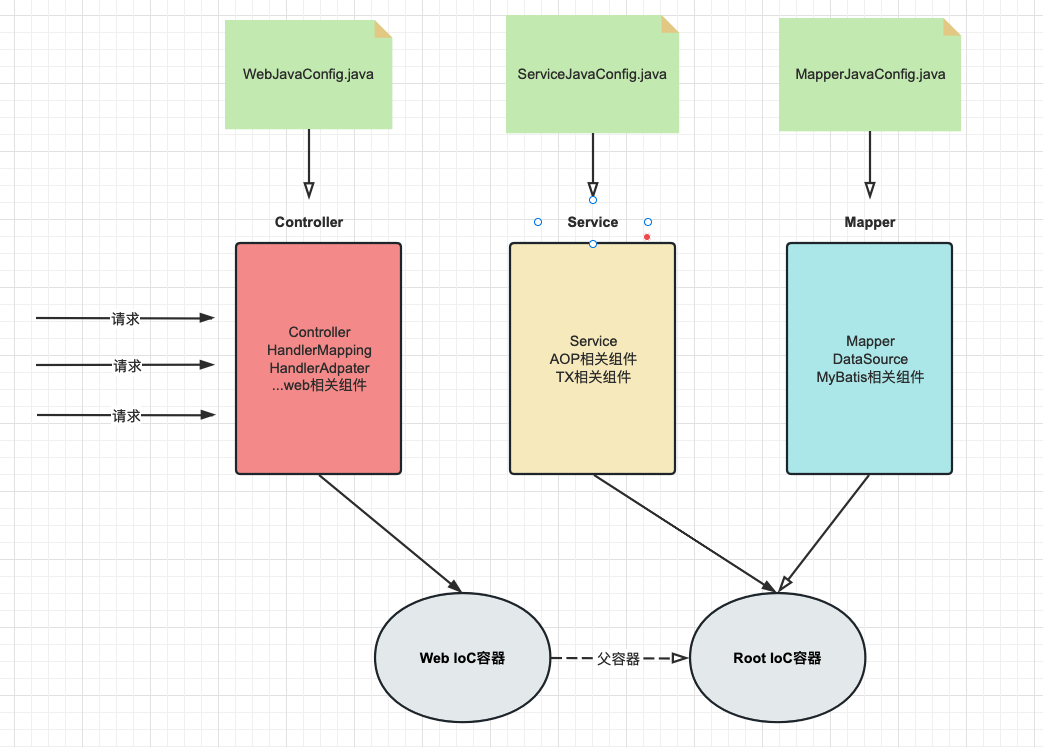
1.2.4 第四问:具体多少配置类以及对应容器关系? 配置类的数量不是固定的,但是至少要两个,为了方便编写,我们可以三层架构每层对应一个配置类,分别指定两个容器加载即可!
建议配置文件:
配置名
对应内容
对应容器
WebJavaConfig
controller,springmvc相关
web容器
ServiceJavaConfig
service,aop,tx相关
root容器
MapperJavaConfig
mapper,datasource,mybatis相关
root容器
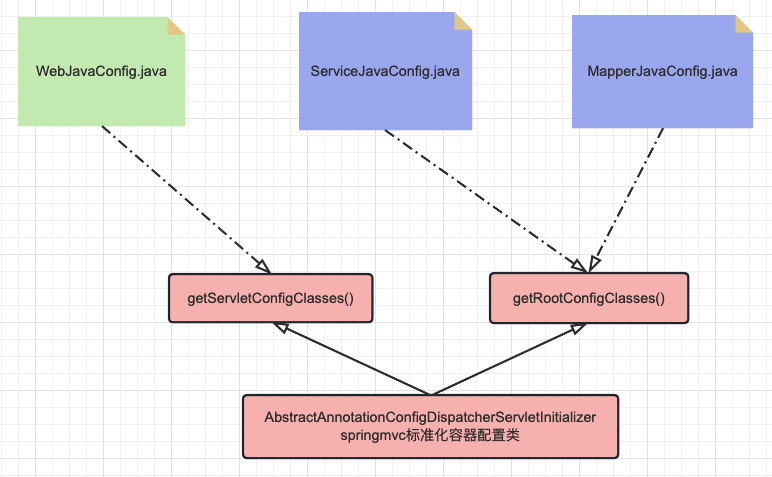
1.2.5 第五问:IoC初始化方式和配置位置? 在web项目下,我们可以选择web.xml和配置类方式进行ioc配置,推荐配置类。
对于使用基于 web 的 Spring 配置的应用程序,建议这样做,如以下示例所示:
1
2
3
4
5
6
7
8
9
10
11
12
13
14
15
16
17
18
19
20
21
public class MyWebAppInitializer extends AbstractAnnotationConfigDispatcherServletInitializer { @Override protected Class<?>[] getRootConfigClasses() { return new Class <?>[] { ServiceJavaConfig.class,MapperJavaConfig.class }; } @Override protected Class<?>[] getServletConfigClasses() { return new Class <?>[] { WebJavaConfig.class }; } @Override protected String[] getServletMappings() { return new String [] { "/" }; } }
图解配置类和容器配置:
二、SSM整合配置实战 2.1 依赖整合和添加
数据库准备
依然沿用mybatis数据库测试脚本!
1
2
3
4
5
6
7
8
9
10
11
12
13
14
CREATE DATABASE `mybatis- example`;USE `mybatis- example`; CREATE TABLE `t_emp`( emp_id INT AUTO_INCREMENT, emp_name CHAR (100 ), emp_salary DOUBLE (10 ,5 ), PRIMARY KEY(emp_id) ); INSERT INTO `t_emp`(emp_name,emp_salary) VALUES ("tom",200.33 );INSERT INTO `t_emp`(emp_name,emp_salary) VALUES ("jerry",666.66 );INSERT INTO `t_emp`(emp_name,emp_salary) VALUES ("andy",777.77 );
准备项目
part04-ssm-integration
转成web项目
依赖导入
pom.xml
1
2
3
4
5
6
7
8
9
10
11
12
13
14
15
16
17
18
19
20
21
22
23
24
25
26
27
28
29
30
31
32
33
34
35
36
37
38
39
40
41
42
43
44
45
46
47
48
49
50
51
52
53
54
55
56
57
58
59
60
61
62
63
64
65
66
67
68
69
70
71
72
73
74
75
76
77
78
79
80
81
82
83
84
85
86
87
88
89
90
91
92
93
94
95
96
97
98
99
100
101
102
103
104
105
106
107
108
109
110
111
112
113
114
115
116
117
118
119
120
121
122
123
124
125
126
127
128
129
130
131
132
133
134
135
136
137
138
139
140
141
142
143
144
145
146
147
148
149
150
151
152
153
154
155
156
157
158
159
160
161
162
163
164
165
166
167
168
169
170
171
172
173
174
175
176
177
178
179
180
181
182
183
184
185
186
187
188
189
190
191
192
193
194
195
196
197
198
199
200
201
202
203
204
205
206
207
208
209
210
211
212
213
214
215
216
217
218
219
220
221
222
223
224
225
226
227
228
229
230
231
232
233
234
235
236
237
238
239
240
241
242
243
244
245
246
247
248
249
250
251
252
253
254
255
256
257
258
259
260
261
262
263
264
265
266
267
268
269
270
271
272
273
274
275
276
277
278
279
280
281
282
283
284
285
286
287
288
289
290
291
292
293
294
295
296
297
298
299
300
301
302
<?xml version="1.0" encoding="UTF-8" ?> <project xmlns ="http://maven.apache.org/POM/4.0.0" xmlns:xsi ="http://www.w3.org/2001/XMLSchema-instance" xsi:schemaLocation ="http://maven.apache.org/POM/4.0.0 http://maven.apache.org/xsd/maven-4.0.0.xsd" > <modelVersion > 4.0.0</modelVersion > <groupId > com.atguigu</groupId > <artifactId > part04-ssm-integration</artifactId > <version > 1.0-SNAPSHOT</version > <packaging > war</packaging > <properties > <spring.version > 6.0.6</spring.version > <jakarta.annotation-api.version > 2.1.1</jakarta.annotation-api.version > <jakarta.jakartaee-web-api.version > 9.1.0</jakarta.jakartaee-web-api.version > <jackson-databind.version > 2.15.0</jackson-databind.version > <hibernate-validator.version > 8.0.0.Final</hibernate-validator.version > <mybatis.version > 3.5.11</mybatis.version > <mysql.version > 8.0.25</mysql.version > <pagehelper.version > 5.1.11</pagehelper.version > <druid.version > 1.2.8</druid.version > <mybatis-spring.version > 3.0.2</mybatis-spring.version > <jakarta.servlet.jsp.jstl-api.version > 3.0.0</jakarta.servlet.jsp.jstl-api.version > <logback.version > 1.2.3</logback.version > <lombok.version > 1.18.26</lombok.version > <maven.compiler.source > 17</maven.compiler.source > <maven.compiler.target > 17</maven.compiler.target > <project.build.sourceEncoding > UTF-8</project.build.sourceEncoding > </properties > <dependencies > <dependency > <groupId > org.springframework</groupId > <artifactId > spring-context</artifactId > <version > ${spring.version}</version > </dependency > <dependency > <groupId > jakarta.annotation</groupId > <artifactId > jakarta.annotation-api</artifactId > <version > ${jakarta.annotation-api.version}</version > </dependency > <dependency > <groupId > org.springframework</groupId > <artifactId > spring-aop</artifactId > <version > ${spring.version}</version > </dependency > <dependency > <groupId > org.springframework</groupId > <artifactId > spring-aspects</artifactId > <version > ${spring.version}</version > </dependency > <dependency > <groupId > org.springframework</groupId > <artifactId > spring-tx</artifactId > <version > ${spring.version}</version > </dependency > <dependency > <groupId > org.springframework</groupId > <artifactId > spring-jdbc</artifactId > <version > ${spring.version}</version > </dependency > <dependency > <groupId > org.springframework</groupId > <artifactId > spring-webmvc</artifactId > <version > ${spring.version}</version > </dependency > <dependency > <groupId > jakarta.platform</groupId > <artifactId > jakarta.jakartaee-web-api</artifactId > <version > ${jakarta.jakartaee-web-api.version}</version > <scope > provided</scope > </dependency > <dependency > <groupId > jakarta.servlet.jsp.jstl</groupId > <artifactId > jakarta.servlet.jsp.jstl-api</artifactId > <version > ${jakarta.servlet.jsp.jstl-api.version}</version > </dependency > <dependency > <groupId > com.fasterxml.jackson.core</groupId > <artifactId > jackson-databind</artifactId > <version > ${jackson-databind.version}</version > </dependency > <dependency > <groupId > org.hibernate.validator</groupId > <artifactId > hibernate-validator</artifactId > <version > ${hibernate-validator.version}</version > </dependency > <dependency > <groupId > org.hibernate.validator</groupId > <artifactId > hibernate-validator-annotation-processor</artifactId > <version > ${hibernate-validator.version}</version > </dependency > <dependency > <groupId > org.mybatis</groupId > <artifactId > mybatis</artifactId > <version > ${mybatis.version}</version > </dependency > <dependency > <groupId > mysql</groupId > <artifactId > mysql-connector-java</artifactId > <version > ${mysql.version}</version > </dependency > <dependency > <groupId > com.github.pagehelper</groupId > <artifactId > pagehelper</artifactId > <version > ${pagehelper.version}</version > </dependency > <dependency > <groupId > org.springframework</groupId > <artifactId > spring-web</artifactId > <version > ${spring.version}</version > </dependency > <dependency > <groupId > org.mybatis</groupId > <artifactId > mybatis-spring</artifactId > <version > ${mybatis-spring.version}</version > </dependency > <dependency > <groupId > ch.qos.logback</groupId > <artifactId > logback-classic</artifactId > <version > ${logback.version}</version > </dependency > <dependency > <groupId > org.projectlombok</groupId > <artifactId > lombok</artifactId > <version > ${lombok.version}</version > </dependency > <dependency > <groupId > com.alibaba</groupId > <artifactId > druid</artifactId > <version > ${druid.version}</version > </dependency > </dependencies > </project >
实体类添加
com.atguigu.pojo
1
2
3
4
5
6
7
@Data public class Employee { private Integer empId; private String empName; private Double empSalary; }
logback配置
位置:resources/logback.xml
1
2
3
4
5
6
7
8
9
10
11
12
13
14
15
16
17
18
19
20
21
22
23
24
25
26
27
28
29
30
<?xml version="1.0" encoding="UTF-8" ?> <configuration debug ="true" > <appender name ="STDOUT" class ="ch.qos.logback.core.ConsoleAppender" > <encoder > <pattern > [%d{HH:mm:ss.SSS}] [%-5level] [%thread] [%logger] [%msg]%n</pattern > <charset > UTF-8</charset > </encoder > </appender > <root level ="DEBUG" > <appender-ref ref ="STDOUT" /> </root > <logger name ="com.atguigu.mybatis" level ="DEBUG" /> </configuration >
2.2 控制层配置编写(SpringMVC整合)
主要配置controller,springmvc相关组件配置
位置:WebJavaConfig.java(命名随意)
1 2 3 4 5 6 7 8 9 10 11 12 13 14 15 16 17 18 19 20 21 22 @Configuration @EnableWebMvc @ComponentScan("com.atguigu.controller") public class WebJavaConfig implements WebMvcConfigurer { @Override public void configureDefaultServletHandling (DefaultServletHandlerConfigurer configurer) { configurer.enable(); } }
2.3 业务层配置编写(AOP / TX整合)
主要配置service,注解aop和声明事务相关配置
位置:ServiceJavaConfig.java(命名随意)
1 2 3 4 5 6 7 8 9 10 11 12 13 14 15 16 17 18 19 20 21 22 23 @EnableTransactionManagement @EnableAspectJAutoProxy @Configuration @ComponentScan("com.atguigu.service") public class ServiceJavaConfig { @Bean public DataSourceTransactionManager transactionManager (DataSource dataSource) { DataSourceTransactionManager transactionManager = new DataSourceTransactionManager (); transactionManager.setDataSource(dataSource); return transactionManager; } }
2.4 持久层配置编写(MyBatis整合)
主要配置mapper代理对象,连接池和mybatis核心组件配置
mybatis整合思路
mybatis核心api使用回顾:
1 2 3 4 5 6 7 8 9 10 11 12 13 14 15 16 InputStream ips = Resources.getResourceAsStream("mybatis-config.xml" );SqlSessionFactory sqlSessionFactory = new SqlSessionFactoryBuilder ().build(ips);SqlSession sqlSession = sqlSessionFactory.openSession();EmpMapper empMapper = sqlSession.getMapper(EmpMapper.class);int rows = empMapper.deleteEmpById(1 );System.out.println("rows = " + rows); sqlSession.commit(); sqlSession.close();
mybatis核心api介绍回顾:
- SqlSessionFactoryBuilder
这个类可以被实例化、使用和丢弃,一旦创建了 SqlSessionFactory,就不再需要它了。
- SqlSessionFactory
一旦被创建就应该在应用的运行期间一直存在,没有任何理由丢弃它或重新创建另一个实例。 使用 SqlSessionFactory 的最佳实践是在应用运行期间不要重复创建多次,因此 SqlSessionFactory 的最佳作用域是应用作用域。 需要ioc容器管理!
- SqlSession
每个线程都应该有它自己的 SqlSession 实例。SqlSession 的实例不是线程安全的,因此是不能被共享的,所以它的最佳的作用域是请求或方法作用域。 无需ioc容器管理!
- Mapper映射器实例
映射器是一些绑定映射语句的接口。映射器接口的实例是从 SqlSession 中获得的。虽然从技术层面上来讲,任何映射器实例的最大作用域与请求它们的 SqlSession 相同。但方法作用域才是映射器实例的最合适的作用域。
从作用域的角度来说,映射器实例不应该交给ioc容器管理!
但是从使用的角度来说,业务类(service)需要注入mapper接口,所以mapper应该交给ioc容器管理!
- 总结
    * 将SqlSessionFactory实例存储到IoC容器
    * 将Mapper实例存储到IoC容器
mybatis整合思路理解:
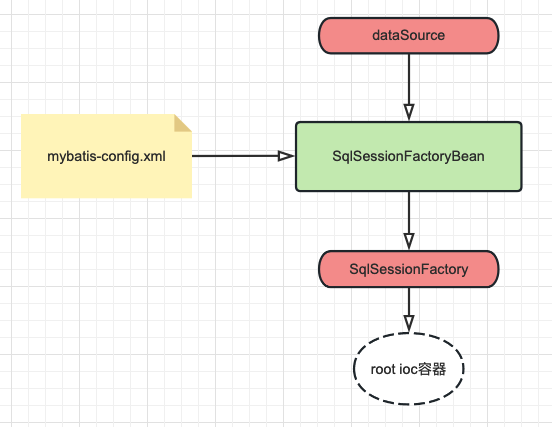
例如,自己实现sqlSessionFactory加入ioc容器:
1
2
3
4
5
6
7
8
9
10
@Bean public SqlSessionFactory sqlSessionFactory () { InputStream ips = Resources.getResourceAsStream("mybatis-config.xml" ); SqlSessionFactory sqlSessionFactory = new SqlSessionFactoryBuilder ().build(ips); return sqlSessionFactory; }
过程比较繁琐,为了提高整合效率,mybatis提供了提供封装SqlSessionFactory和Mapper实例化的逻辑的FactoryBean组件,我们只需要声明和指定少量的配置即可!
SqlSessionFactoryBean源码展示(mybatis提供):
1
2
3
4
5
6
7
8
9
10
11
12
13
14
15
16
package org.mybatis.spring;public class SqlSessionFactoryBean implements FactoryBean <SqlSessionFactory>, InitializingBean, ApplicationListener<ContextRefreshedEvent> { public SqlSessionFactory getObject () throws Exception { if (this .sqlSessionFactory == null ) { afterPropertiesSet(); } return this .sqlSessionFactory; } }
mybatis整合思路总结:
- 需要将SqlSessionFactory和Mapper实例加入到IoC容器
- 使用mybatis整合包提供的FactoryBean快速整合
准备外部配置文件
数据库连接信息
1
2
3
4
jdbc.user=root jdbc.password=root jdbc.url=jdbc:mysql:///mybatis-example jdbc.driver=com.mysql.cj.jdbc.Driver
整合方式1 (保留mybatis-config.xml)
介绍
依然保留mybatis的外部配置文件(xml), 但是数据库连接信息交给Druid连接池配置!
2. mybatis配置文件
数据库信息以及mapper扫描包设置使用Java配置类处理!mybatis其他的功能(别名、settings、插件等信息)依然在mybatis-config.xml配置!
1
2
3
4
5
6
7
8
9
10
11
12
13
14
15
16
17
18
19
20
21
22
23
24
25
26
27
28
29
30
31
32
33
34
35
36
37
<?xml version="1.0" encoding="UTF-8" ?> <!DOCTYPE configuration PUBLIC "-//mybatis.org//DTD Config 3.0//EN" "http://mybatis.org/dtd/mybatis-3-config.dtd" > <configuration > <settings > <setting name ="mapUnderscoreToCamelCase" value ="true" /> <setting name ="logImpl" value ="SLF4J" /> <setting name ="autoMappingBehavior" value ="FULL" /> </settings > <typeAliases > <package name ="com.atguigu.pojo" /> </typeAliases > <plugins > <plugin interceptor ="com.github.pagehelper.PageInterceptor" > <property name ="helperDialect" value ="mysql" /> </plugin > </plugins > </configuration >
3. mybatis和持久层配置类
持久层Mapper配置、数据库配置、Mybatis配置信息
1
2
3
4
5
6
7
8
9
10
11
12
13
14
15
16
17
18
19
20
21
22
23
24
25
26
27
28
29
30
31
32
33
34
35
36
37
38
39
40
41
42
43
44
45
46
47
48
49
50
51
52
53
54
55
56
57
58
@Configuration @PropertySource("classpath:jdbc.properties") public class MapperJavaConfig { @Value("${jdbc.user}") private String user; @Value("${jdbc.password}") private String password; @Value("${jdbc.url}") private String url; @Value("${jdbc.driver}") private String driver; @Bean public DataSource dataSource () { DruidDataSource dataSource = new DruidDataSource (); dataSource.setUsername(user); dataSource.setPassword(password); dataSource.setUrl(url); dataSource.setDriverClassName(driver); return dataSource; } @Bean public SqlSessionFactoryBean sqlSessionFactoryBean (DataSource dataSource) { SqlSessionFactoryBean sqlSessionFactoryBean = new SqlSessionFactoryBean (); sqlSessionFactoryBean.setDataSource(dataSource); Resource resource = new ClassPathResource ("mybatis-config.xml" ); sqlSessionFactoryBean.setConfigLocation(resource); return sqlSessionFactoryBean; } @Bean public MapperScannerConfigurer mapperScannerConfigurer () { MapperScannerConfigurer mapperScannerConfigurer = new MapperScannerConfigurer (); mapperScannerConfigurer.setBasePackage("com.atguigu.mapper" ); return mapperScannerConfigurer; } }
问题:
当你在Spring配置类中添加了sqlSessionFactoryBean和mapperScannerConfigurer配置方法时,可能会导致@Value注解读取不到值为null的问题。这是因为SqlSessionFactoryBean和MapperScannerConfigurer是基于MyBatis框架的配置,它们的初始化顺序可能会导致属性注入的问题。
SqlSessionFactoryBean和MapperScannerConfigurer在配置类中通常是用来配置MyBatis相关的Bean,例如数据源、事务管理器、Mapper扫描等。这些配置类通常在@Configuration注解下定义,并且使用@Value注解来注入属性值。
当配置类被加载时,Spring容器会首先处理Bean的定义和初始化,其中包括sqlSessionFactoryBean和mapperScannerConfigurer的初始化。在这个过程中,如果@Value注解所在的Bean还没有被完全初始化,可能会导致注入的属性值为null。
解决方案:
分成两个配置类独立配置,互不影响,数据库提取一个配置类,mybatis提取一个配置类即可解决!
拆分配置
数据库配置类(DataSourceJavaConfig.java)
1
2
3
4
5
6
7
8
9
10
11
12
13
14
15
16
17
18
19
20
21
22
23
@Configuration @PropertySource("classpath:jdbc.properties") public class DataSourceJavaConfig { @Value("${jdbc.user}") private String user; @Value("${jdbc.password}") private String password; @Value("${jdbc.url}") private String url; @Value("${jdbc.driver}") private String driver; /数据库连接池配置 @Bean public DataSource dataSource () { DruidDataSource dataSource = new DruidDataSource (); dataSource.setUsername(user); dataSource.setPassword(password); dataSource.setUrl(url); dataSource.setDriverClassName(driver); return dataSource; } }
mybatis配置类(MapperJavaConfig.java)
1
2
3
4
5
6
7
8
9
10
11
12
13
14
15
16
17
18
19
20
21
22
23
24
25
26
27
28
29
30
31
32
33
34
35
36
37
@Configuration public class MapperJavaConfig { @Bean public SqlSessionFactoryBean sqlSessionFactoryBean (DataSource dataSource) { SqlSessionFactoryBean sqlSessionFactoryBean = new SqlSessionFactoryBean (); sqlSessionFactoryBean.setDataSource(dataSource); Resource resource = new ClassPathResource ("mybatis-config.xml" ); sqlSessionFactoryBean.setConfigLocation(resource); return sqlSessionFactoryBean; } @Bean public MapperScannerConfigurer mapperScannerConfigurer () { MapperScannerConfigurer mapperScannerConfigurer = new MapperScannerConfigurer (); mapperScannerConfigurer.setBasePackage("com.atguigu.mapper" ); return mapperScannerConfigurer; } }
1
2
3
4
5
6
7
8
9
10
11
12
13
14
15
16
17
18
19
20
21
22
23
24
25
26
27
28
29
30
31
32
33
34
35
36
37
38
39
40
41
42
43
44
45
46
47
48
49
50
51
52
53
54
55
56
57
58
59
60
61
62
63
64
65
66
67
68
69
70
71
72
73
74
75
76
77
78
79
80
81
82
83
84
85
86
87
88
89
90
91
92
93
94
95
96
97
98
99
100
101
102
103
104
5. **整合方式2(完全配置类 去掉mybatis-config.xml)** 1. 介绍 不在保留mybatis的外部配置文件(xml), 所有配置信息(settings、插件、别名等)全部在声明SqlSessionFactoryBean的代码中指定!数据库信息依然使用DruidDataSource实例替代! 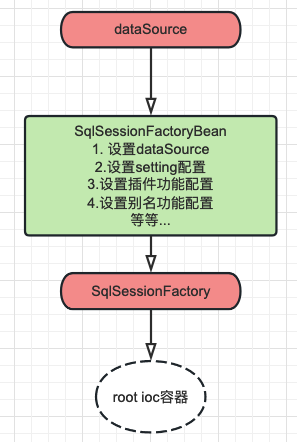 优势:全部配置类,避免了XML文件解析效率低问题! 2. mapper配置类 ```java /** * projectName: com.atguigu.config * * description: 持久层配置和Druid和Mybatis配置 使用一个配置文件 */ @Configuration public class MapperJavaConfigNew { /** * 配置SqlSessionFactoryBean,指定连接池对象和外部配置文件即可 * @param dataSource 需要注入连接池对象 * @return 工厂Bean */ @Bean public SqlSessionFactoryBean sqlSessionFactoryBean(DataSource dataSource){ //实例化SqlSessionFactory工厂 SqlSessionFactoryBean sqlSessionFactoryBean = new SqlSessionFactoryBean(); //设置连接池 sqlSessionFactoryBean.setDataSource(dataSource); //TODO: 替代xml文件的java配置 /* <settings> <!-- 开启驼峰式映射--> <setting name="mapUnderscoreToCamelCase" value="true"/> <!-- 开启logback日志输出--> <setting name="logImpl" value="SLF4J"/> <!--开启resultMap自动映射 --> <setting name="autoMappingBehavior" value="FULL"/> </settings> <typeAliases> <!-- 给实体类起别名 --> <package name="com.atguigu.pojo"/> </typeAliases> <plugins> <plugin interceptor="com.github.pagehelper.PageInterceptor"> <!-- helperDialect:分页插件会自动检测当前的数据库链接,自动选择合适的分页方式。 你可以配置helperDialect属性来指定分页插件使用哪种方言。配置时,可以使用下面的缩写值: oracle,mysql,mariadb,sqlite,hsqldb,postgresql,db2,sqlserver,informix,h2,sqlserver2012,derby (完整内容看 PageAutoDialect) 特别注意:使用 SqlServer2012 数据库时, https://github.com/pagehelper/Mybatis-PageHelper/blob/master/wikis/zh/HowToUse.md#%E5%A6%82%E4%BD%95%E9%85%8D%E7%BD%AE%E6%95%B0%E6%8D%AE%E5%BA%93%E6%96%B9%E8%A8%80 --> <property name="helperDialect" value="mysql"/> </plugin> </plugins> */ //settings [包裹到一个configuration对象,切记别倒错包] org.apache.ibatis.session.Configuration configuration = new org.apache.ibatis.session.Configuration(); configuration.setMapUnderscoreToCamelCase(true); configuration.setLogImpl(Slf4jImpl.class); configuration.setAutoMappingBehavior(AutoMappingBehavior.FULL); sqlSessionFactoryBean.setConfiguration(configuration); //typeAliases sqlSessionFactoryBean.setTypeAliasesPackage("com.atguigu.pojo"); //分页插件配置 PageInterceptor pageInterceptor = new PageInterceptor(); Properties properties = new Properties(); properties.setProperty("helperDialect","mysql"); pageInterceptor.setProperties(properties); sqlSessionFactoryBean.addPlugins(pageInterceptor); return sqlSessionFactoryBean; } /** * 配置Mapper实例扫描工厂,配置 <mapper <package 对应接口和mapperxml文件所在的包 * @return */ @Bean public MapperScannerConfigurer mapperScannerConfigurer(){ MapperScannerConfigurer mapperScannerConfigurer = new MapperScannerConfigurer(); //设置mapper接口和xml文件所在的共同包 mapperScannerConfigurer.setBasePackage("com.atguigu.mapper"); return mapperScannerConfigurer; } }
2.5 容器初始化配置类 1 2 3 4 5 6 7 8 9 10 11 12 13 14 15 16 17 18 19 20 public class MyWebAppInitializer extends AbstractAnnotationConfigDispatcherServletInitializer { @Override protected Class<?>[] getRootConfigClasses() { return new Class <?>[] {MapperJavaConfig.class, ServiceJavaConfig.class, DataSourceJavaConfig.class }; } @Override protected Class<?>[] getServletConfigClasses() { return new Class <?>[] { WebJavaConfig.class }; } @Override protected String[] getServletMappings() { return new String [] { "/" }; } }
2.6 整合测试
需求
查询所有员工信息,返回对应json数据!
controller
1 2 3 4 5 6 7 8 9 10 11 12 13 14 15 16 @Slf4j @RestController @RequestMapping("/employee") public class EmployeeController { @Autowired private EmployeeService employeeService; @GetMapping("list") public List<Employee> retList () { List<Employee> employees = employeeService.findAll(); log.info("员工数据:{}" ,employees); return employees; } }
service
1 2 3 4 5 6 7 8 9 10 11 12 13 14 15 16 @Service public class EmployeeServiceImpl implements EmployeeService { @Autowired private EmployeeMapper employeeMapper; @Override public List<Employee> findAll () { List<Employee> employeeList = employeeMapper.queryAll(); return employeeList; } }
mapper
mapper接口 包:com.atguigu.mapper
1 2 3 4 5 public interface EmployeeMapper { List<Employee> queryAll () ; }
mapper XML 文件位置: resources/mappers
1 2 3 4 5 6 7 8 9 10 11 12 13 14 15 <?xml version="1.0" encoding="UTF-8" ?> <!DOCTYPE mapper PUBLIC "-//mybatis.org//DTD Mapper 3.0//EN" "https://mybatis.org/dtd/mybatis-3-mapper.dtd" > <mapper namespace ="com.atguigu.mapper.EmployeeMapper" > <select id ="queryAll" resultType ="employee" > select emp_id empId,emp_name empName, emp_salary empSalary from t_emp </select > </mapper >
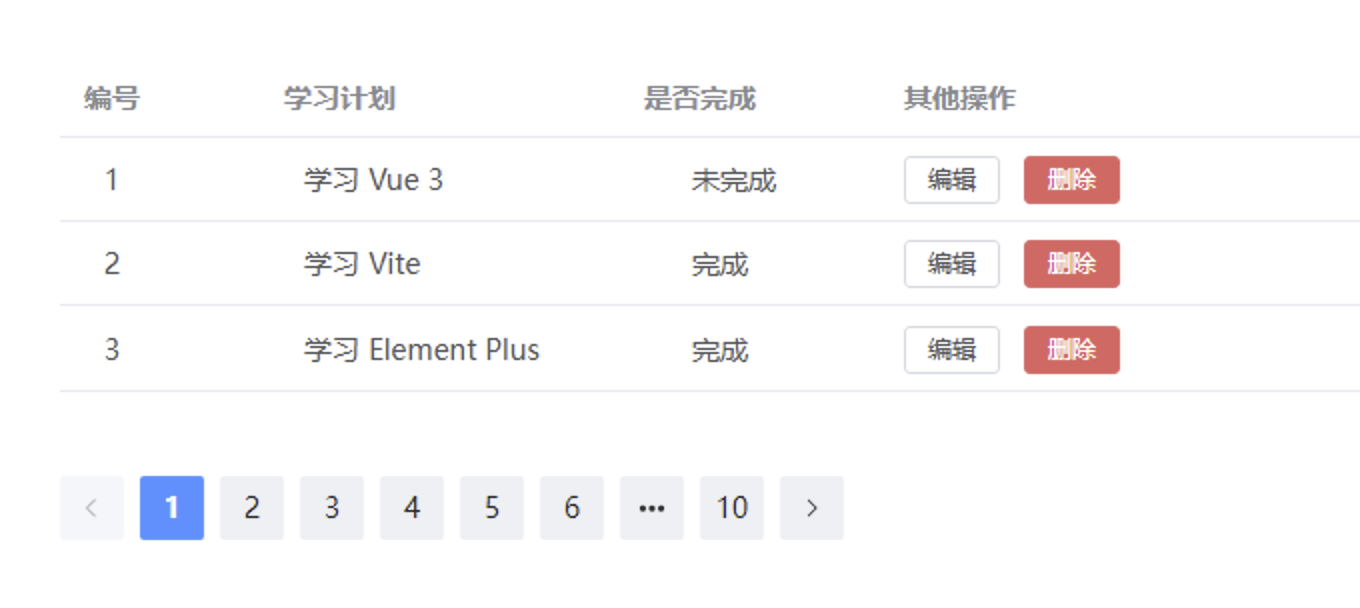
三、《任务列表案例》前端程序搭建和运行 3.1 整合案例介绍和接口分析 3.1.1 案例功能预览
3.1.2接口分析
学习计划分页查询
1 2 3 4 5 6 7 8 9 10 11 12 13 14 15 16 17 18 19 20 21 22 23 24 25 26 27 28
学习计划删除
学习计划保存
1 2 3 4 5 6 7 8 9 10 11 12 13 14 15 16 17 18 19
学习计划修改
1 2 3 4 5 6 7 8 9 10 11 12 13 14 15 16 17 18 19 20
3.2 前端工程导入 3.2.1 前端环境搭建
Node.js 是前端程序运行的服务器,类似Java程序运行的服务器Tomcat Npm 是前端依赖包管理工具,类似maven依赖管理工具软件
node安装课程node版本:16.16.0https://nodejs.org/download/release/v16.16.0/ node安装和测试:
打开官网 https://nodejs.org/en/ 下载对应操作系统的 LTS 版本。(16.16.0)node-v16.16.0-x64.msi
双击安装包进行安装,安装过程中遵循默认选项即可。安装完成后,可以在命令行终端输入 node -v 和 npm -v 查看 Node.js 和 npm 的版本号。
npm使用 (maven)
NPM全称Node Package Manager,是Node.js包管理工具,是全球最大的模块生态系统,里面所有的模块都是开源免费的;也是Node.js的包管理工具,相当于后端的Maven 。
配置阿里镜像
更新npm版本
npm依赖下载命令
1 npm config set registry https:
1 npm install -g npm@9.6 .6
1 npm install 依赖名 / npm install 依赖名@版本
安装vscode VSCodeUserSetup-x64-1.74.0.exe
3.2.2 导入前端程序 vue3-demo2.rar
点击加载前端程序!
3.3 启动测试 1 2 npm install npm run dev
四、《任务列表案例》后端程序实现和测试 4.1 准备工作
准备数据库脚本
1 2 3 4 5 6 7 8 9 10 11 12 13 14 15 16 17 18 19 20 21 22 23 24 25 26 27 28 29 30 CREATE TABLE schedule ( id INT NOT NULL AUTO_INCREMENT, title VARCHAR (255 ) NOT NULL , completed BOOLEAN NOT NULL , PRIMARY KEY (id) ); INSERT INTO schedule (title, completed)VALUES ('学习java' , true ), ('学习Python' , false ), ('学习C++' , true ), ('学习JavaScript' , false ), ('学习HTML5' , true ), ('学习CSS3' , false ), ('学习Vue.js' , true ), ('学习React' , false ), ('学习Angular' , true ), ('学习Node.js' , false ), ('学习Express' , true ), ('学习Koa' , false ), ('学习MongoDB' , true ), ('学习MySQL' , false ), ('学习Redis' , true ), ('学习Git' , false ), ('学习Docker' , true ), ('学习Kubernetes' , false ), ('学习AWS' , true ), ('学习Azure' , false );
准备pojo
包:com.atguigu.pojo
1 2 3 4 5 6 7 8 9 10 11 12 13 @Data public class Schedule { private Integer id; private String title; private Boolean completed; }
准备 R
包:com.atguigu.utils
1 2 3 4 5 6 7 8 9 10 11 12 ** * projectName: com.atguigu.utils * * description: 返回结果类 */ public class R { private int code = 200 ; private boolean flag = true ; private Object data;
1 2 3 4 5 6 7 8 9 10 11 12 13 14 15 16 17 18 19 20 21 22 23 24 25 26 27 28 29 30 31 32 33 34 35 36 37 38 public static R ok(Object data){ R r = new R(); r.data = data; return r; } public static R fail(Object data){ R r = new R(); r.code = 500; //错误码 r.flag = false; //错误状态 r.data = data; return r; } public int getCode() { return code; } public void setCode(int code) { this.code = code; } public boolean isFlag() { return flag; } public void setFlag(boolean flag) { this.flag = flag; } public Object getData() { return data; } public void setData(Object data) { this.data = data; }
}
准备 PageBean
包:com.atguigu.utils
1 2 3 4 5 6 7 8 9 10 @Data @NoArgsConstructor @AllArgsConstructor public class PageBean <T> { private int currentPage; private int pageSize; private long total; private List<T> data; }
4.2 功能实现
分页查询
controller
1 2 3 4 5 6 7 8 9 10 11 12 13 14 15 16 17 18 @CrossOrigin @RequestMapping("schedule") @RestController public class ScheduleController { @Autowired private ScheduleService scheduleService; @GetMapping("/{pageSize}/{currentPage}") public R showList (@PathVariable(name = "pageSize") int pageSize, @PathVariable(name = "currentPage") int currentPage) { PageBean<Schedule> pageBean = scheduleService.findByPage(pageSize,currentPage); return R.ok(pageBean); } }
2. service
1 2 3 4 5 6 7 8 9 10 11 12 13 14 15 16 17 18 19 20 21 22 23 24 25 26 27 28 29 30 31 @Slf4j @Service public class ScheduleServiceImpl implements ScheduleService { @Autowired private ScheduleMapper scheduleMapper; @Override public PageBean<Schedule> findByPage (int pageSize, int currentPage) { PageHelper.startPage(currentPage,pageSize); List<Schedule> list = scheduleMapper.queryPage(); PageInfo<Schedule> pageInfo = new PageInfo <>(list); PageBean<Schedule> pageBean = new PageBean <>(pageInfo.getPageNum(),pageInfo.getPageSize(),pageInfo.getTotal(),pageInfo.getList()); log.info("分页查询结果:{}" ,pageBean); return pageBean; } }
3. mapper
mapper接口
1 2 3 4 public interface ScheduleMapper { List<Schedule> queryPage () ; }
mapperxml文件
1 2 3 4 5 6 7 8 9 10 11 12 <?xml version="1.0" encoding="UTF-8" ?> <!DOCTYPE mapper PUBLIC "-//mybatis.org//DTD Mapper 3.0//EN" "https://mybatis.org/dtd/mybatis-3-mapper.dtd" > <mapper namespace ="com.atguigu.mapper.ScheduleMapper" > <select id ="queryPage" resultType ="schedule" > select * from schedule </select > </mapper >
计划添加
controller
1 2 3 4 5 @PostMapping public R saveSchedule (@RequestBody Schedule schedule) { scheduleService.saveSchedule(schedule); return R.ok(null ); }
1. service
1 2 3 4 5 6 7 8 9 @Override public void saveSchedule (Schedule schedule) { scheduleMapper.insert(schedule); }
2. mapper
mapper接口
1 void insert (Schedule schedule) ;
mapperxml文件
1 2 3 4 5 6 <insert id ="insert" > insert into schedule (title, completed) values (#{title}, #{completed}); </insert >
3.计划删除
1. controller
1 2 3 4 5 @DeleteMapping("/{id}") public R removeSchedule (@PathVariable Integer id) { scheduleService.removeById(id); return R.ok(null ); }
2. service
1 2 3 4 5 6 7 8 9 @Override public void removeById (Integer id) { scheduleMapper.delete(id); }
3. mapper
mapper接口
1 void delete (Integer id) ;
mapperxml文件
1 2 3 4 <delete id ="delete" > delete from schedule where id = #{id} </delete >
4.计划修改
1. controller
1 2 3 4 5 @PutMapping public R changeSchedule (@RequestBody Schedule schedule) { scheduleService.updateSchedule(schedule); return R.ok(null ); }
1. service
1 2 3 4 5 6 7 8 9 @Override public void updateSchedule (Schedule schedule) { scheduleMapper.update(schedule); }
1. mapper
mapper接口
1 void update (Schedule schedule) ;
mapperxml文件
1 2 3 4 5 <update id ="update" > update schedule set title = #{title} , completed = #{completed} where id = #{id} </update >
4.3 前后联调
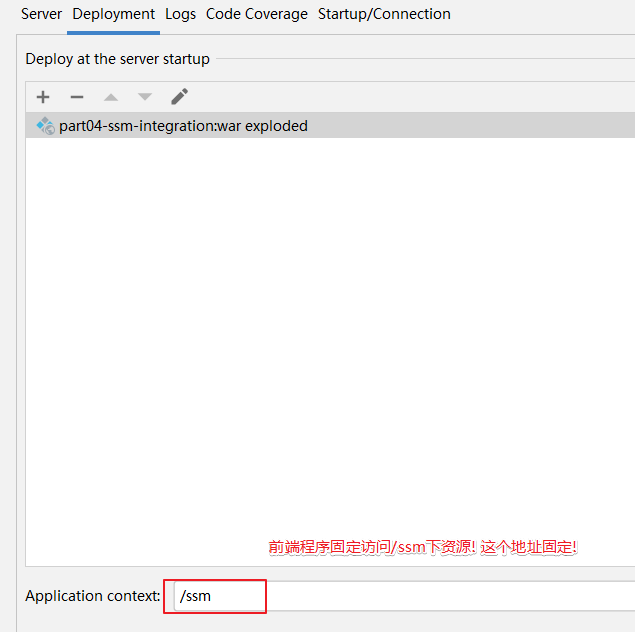
后台项目根路径设计
启动测试即可


 所以mapper应该交给ioc容器管理!
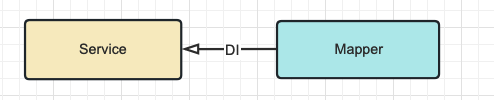
 缺点:依然需要mybatis-config.xml文件,进行xml文件解析,效率偏低!