三、Spring IoC容器和核心概念 3.1 组件和组件管理概念
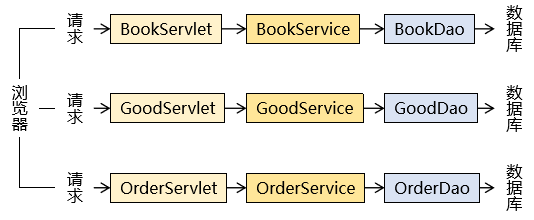
回顾常规的三层架构处理请求流程:
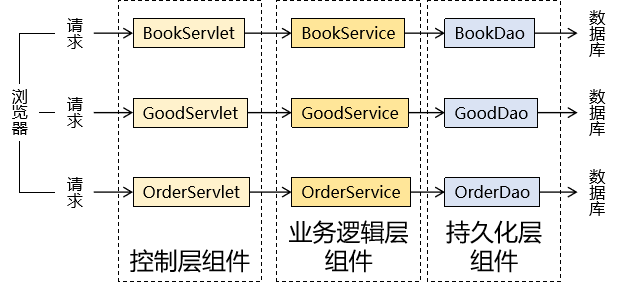
整个项目就是由各种组件搭建而成的:
3.1.2 我们的期待
有人替我们创建组件的对象
有人帮我们保存组件的对象
有人帮助我们自动组装
有人替我们管理事务
有人协助我们整合其他框架
……
3.1.3 Spring充当组件管理角色(IoC) 那么谁帮我们完成我们的期待,帮我们管理组件呢?当然是Spring 框架了!组件可以完全交给Spring 框架进行管理,Spring框架替代了程序员原有的new对象和对象属性赋值动作等!Spring具体的组件管理动作包含:
组件对象实例化
组件属性属性赋值
组件对象之间引用
组件对象存活周期管理
……
组件一定是对象
对象不一定是组件
3.1.4 组件交给Spring管理优势 !
降低了组件之间的耦合性:Spring IoC容器通过依赖注入机制,将组件之间的依赖关系削弱,减少了程序组件之间的耦合性,使得组件更加松散地耦合。
提高了代码的可重用性和可维护性:将组件的实例化过程、依赖关系的管理等功能交给Spring IoC容器处理,使得组件代码更加模块化、可重用、更易于维护。
方便了配置和管理:Spring IoC容器通过XML文件或者注解,轻松的对组件进行配置和管理,使得组件的切换、替换等操作更加的方便和快捷。
交给Spring管理的对象(组件),方可享受Spring框架的其他功能(AOP,声明事务管理)等
3.2 Spring IoC容器和容器实现
3.2.1 普通和复杂容器****普通容器 生活中的普通容器
普通容器只能用来存储,没有更多功能。
数组
集合:List
集合:Set复杂容器
政府管理我们的一生,生老病死都和政府有关。
总结:Spring管理组件的容器,就是一个复杂容器,不仅存储组件,也可以管理组件之间依赖关系,并且创建和销毁组件等!
名称
时机
次数
创建对象
默认情况:接收到第一次请求
修改启动顺序后:Web应用启动过程中
一次
初始化操作
创建对象之后
一次
处理请求
接收到请求
多次
销毁操作
Web应用卸载之前
一次
我们即将要学习的 SpringIoC 容器也是一个复杂容器。它们不仅要负责创建组件的对象、存储组件的对象,还要负责调用组件的方法让它们工作,最终在特定情况下销毁组件。
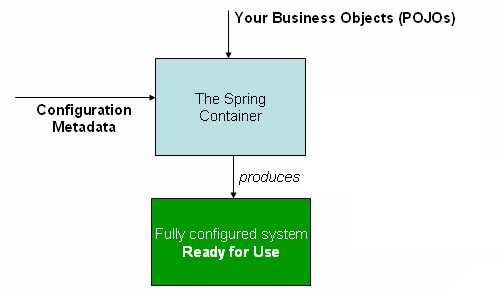
3.2.2 SpringIoC容器介绍 Spring IoC 容器,负责实例化、配置和组装 bean(组件)。容器通过读取配置元数据来获取有关要实例化、配置和组装组件的指令。配置元数据以 XML、Java 注解或 Java 代码形式表现。它允许表达组成应用程序的组件以及这些组件之间丰富的相互依赖关系。
上图显示了 Spring 容器工作原理的高级视图。应用程序类与配置元数据相结合,您拥有完全配置且可执行的系统或应用程序。
3.2.3 SpringIoC容器具体接口和实现类
SpringIoc容器接口 :
BeanFactory 接口提供了一种高级配置机制,能够管理任何类型的对象,它是SpringIoC容器标准化超接口!ApplicationContext 是 BeanFactory 的子接口。它扩展了以下功能:
- 更容易与 Spring 的 AOP 功能集成
- 消息资源处理(用于国际化)
- 特定于应用程序给予此接口实现,例如Web 应用程序的 `WebApplicationContext`
简而言之, BeanFactory 提供了配置框架和基本功能,而 ApplicationContext 添加了更多特定于企业的功能。 ApplicationContext 是 BeanFactory 的完整超集!
ApplicationContext容器实现类 :
类型名
简介
ClassPathXmlApplicationContext
通过读取类路径(resources)下的 XML 格式的配置文件创建 IOC 容器对象
FileSystemXmlApplicationContext
通过文件系统路径(D盘,E盘等)读取 XML 格式的配置文件创建 IOC 容器对象
AnnotationConfigApplicationContext
通过读取Java配置类创建 IOC 容器对象
WebApplicationContext
专门为 Web 应用准备,基于 Web 环境创建 IOC 容器对象,并将对象引入存入 ServletContext 域中。
-
Spring IoC 容器使用多种形式的配置元数据。此配置元数据表示您作为应用程序开发人员如何告诉 Spring 容器实例化、配置和组装应用程序中的对象。
1. XML配置方式:是Spring框架最早的配置方式之一,通过在XML文件中定义Bean及其依赖关系、Bean的作用域等信息,让Spring IoC容器来管理Bean之间的依赖关系。该方式从Spring框架的第一版开始提供支持。
2. 注解方式:从Spring 2.5版本开始提供支持,可以通过在Bean类上使用注解来代替XML配置文件中的配置信息。通过在Bean类上加上相应的注解(如@Component, @Service, @Autowired等),将Bean注册到Spring IoC容器中,这样Spring IoC容器就可以管理这些Bean之间的依赖关系。
3. **Java配置类**方式:从Spring 3.0版本开始提供支持,通过Java类来定义Bean、Bean之间的依赖关系和配置信息,从而代替XML配置文件的方式。Java配置类是一种使用Java编写配置信息的方式,通过@Configuration、@Bean等注解来实现Bean和依赖关系的配置。
为了迎合当下开发环境,我们将以配置类+注解方式 为主进行讲解!
3.3 Spring IoC / DI概念总结
IoC容器 Spring IoC 容器,负责实例化、配置和组装 bean(组件)核心容器。容器通过读取配置元数据来获取有关要实例化、配置和组装组件的指令。IoC(Inversion of Control)控制反转 IoC 主要是针对对象的创建和调用控制而言的,也就是说,当应用程序需要使用一个对象时,不再是应用程序直接创建该对象,而是由 IoC 容器来创建和管理,即控制权由应用程序转移到 IoC 容器中,也就是“反转”了控制权。这种方式基本上是通过依赖查找的方式来实现的,即 IoC 容器维护着构成应用程序的对象,并负责创建这些对象。DI (Dependency Injection) 依赖注入 DI 是指在组件之间传递依赖关系的过程中,将依赖关系在容器内部进行处理,这样就不必在应用程序代码中硬编码对象之间的依赖关系,实现了对象之间的解耦合。在 Spring 中,DI 是通过 XML 配置文件或注解的方式实现的。它提供了三种形式的依赖注入:构造函数注入、Setter 方法注入和接口注入。
四、Spring IoC实践和应用 4.1 Spring IoC / DI 实现步骤
我们总结下,组件交给Spring IoC容器管理,并且获取和使用的基本步骤!
配置元数据(配置)
配置元数据,既是编写交给SpringIoC容器管理组件的信息,配置方式有三种。
基于 XML 的配置元数据的基本结构:
<bean id=”…” [1] class=”…” [2]>
1
2
3
4
5
6
7
8
9
10
11
12
13
14
15
16
17
18
19
<?xml version="1.0" encoding="UTF-8" ?> <beans xmlns ="http://www.springframework.org/schema/beans" xmlns:xsi ="http://www.w3.org/2001/XMLSchema-instance" xsi:schemaLocation ="http://www.springframework.org/schema/beans https://www.springframework.org/schema/beans/spring-beans.xsd" > <bean id ="..." [1 ] class ="..." [2 ]> </bean > <bean id ="..." class ="..." > </bean > </beans >
Spring IoC 容器管理一个或多个组件。这些 组件是使用你提供给容器的配置元数据(例如,以 XML <bean/> 定义的形式)创建的。
- `id` 属性是标识单个 Bean 定义的字符串。
- `class` 属性定义 Bean 的类型并使用完全限定的类名。
实例化IoC容器 提供给 ApplicationContext 构造函数的位置路径是资源字符串地址,允许容器从各种外部资源(如本地文件系统、Java CLASSPATH 等)加载配置元数据。我们应该选择一个合适的容器实现类,进行IoC容器的实例化工作:
1 2 3 ApplicationContext context = new ClassPathXmlApplicationContext ("services.xml" , "daos.xml" );
获取Bean(组件) ApplicationContext 是一个高级工厂的接口,能够维护不同 bean 及其依赖项的注册表。通过使用方法 T getBean(String name, Class<T> requiredType) ,您可以检索 bean 的实例。允许读取 Bean 定义并访问它们,如以下示例所示:
1 2 3 4 5 6 ApplicationContext context = new ClassPathXmlApplicationContext ("services.xml" , "daos.xml" );PetStoreService service = context.getBean("petStore" , PetStoreService.class);List<String> userList = service.getUsernameList();
4.2 基于XML配置方式组件管理 4.2.1 实验一: 组件(Bean)信息声明配置(IoC)
目标Spring IoC 容器管理一个或多个 bean。这些 Bean 是使用您提供给容器的配置元数据创建的(例如,以 XML <bean/> 定义的形式)。我们学习,如何通过定义XML配置文件,声明组件类信息,交给 Spring 的 IoC 容器进行组件管理!
思路
准备项目
创建maven工程(spring-ioc-xml-01)
导入SpringIoC相关依赖pom.xml
1 2 3 4 5 6 7 8 9 10 11 12 13 14 15 16 17 18 19 20 21 22 23 24 <dependencies > <dependency > <groupId > org.springframework</groupId > <artifactId > spring-context</artifactId > <version > 6.0.6</version > </dependency > <dependency > <groupId > org.junit.jupiter</groupId > <artifactId > junit-jupiter-api</artifactId > <version > 5.3.1</version > </dependency > </dependencies >
基于无参数构造函数
当通过构造函数方法创建一个 bean(组件对象) 时,所有普通类都可以由 Spring 使用并与之兼容。也就是说,正在开发的类不需要实现任何特定的接口或以特定的方式进行编码。只需指定 Bean 类信息就足够了。但是,默认情况下,我们需要一个默认(空)构造函数。
a.准备组件类
1
2
3
4
5
6
7
8
9
10
package com.atguigu.ioc;public class HappyComponent { public void doWork () { System.out.println("HappyComponent.doWork" ); } }
b. xml配置文件编写
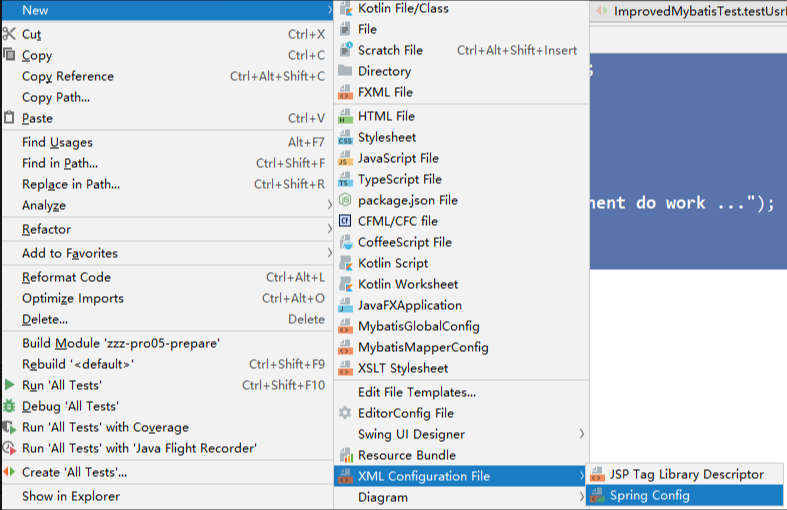
创建携带spring约束的xml配置文件
编写配置文件:
文件:resources/spring-bean-01.xml
1 <bean id="happyComponent" class="com.atguigu.ioc.HappyComponent" />
bean标签:通过配置bean标签告诉IOC容器需要创建对象的组件信息
id属性:bean的唯一标识,方便后期获取Bean!
class属性:组件类的全限定符!
注意:要求当前组件类必须包含无参数构造函数!
基于静态工厂方法实例化
除了使用构造函数实例化对象,还有一类是通过工厂模式实例化对象。接下来我们讲解如何定义使用静态工厂方法创建Bean的配置 !
a.准备组件类
1
2
3
4
5
6
7
8
public class ClientService { private static ClientService clientService = new ClientService (); private ClientService () {} public static ClientService createInstance () { return clientService; } }
1
2
3
4
5
6
b.xml配置文件编写文件:resources/spring-bean-01.xml ```xml <bean id="clientService" class="examples.ClientService" factory-method="createInstance"/>
- class属性:指定工厂类的全限定符!
- factory-method: 指定静态工厂方法,注意,该方法必须是static方法。
基于实例工厂方法实例化
接下来我们讲解下如何定义使用实例工厂方法创建Bean的配置 !
a.准备组建类
1
2
3
4
5
6
7
public class DefaultServiceLocator { private static ClientServiceImpl clientService = new ClientServiceImpl (); public ClientServiceImpl createClientServiceInstance () { return clientService; } }
1
2
3
4
5
6
7
8
9
10
11
12
b.xml配置文件编写文件:resources/spring-bean-01.xml ```xml <!-- 将工厂类进行ioc配置 --> <bean id="serviceLocator" class="examples.DefaultServiceLocator"> </bean> <!-- 根据工厂对象的实例工厂方法进行实例化组件对象 --> <bean id="clientService" factory-bean="serviceLocator" factory-method="createClientServiceInstance"/>
- factory-bean属性:指定当前容器中工厂Bean 的名称。
- factory-method:  指定实例工厂方法名。注意,实例方法必须是非static的!
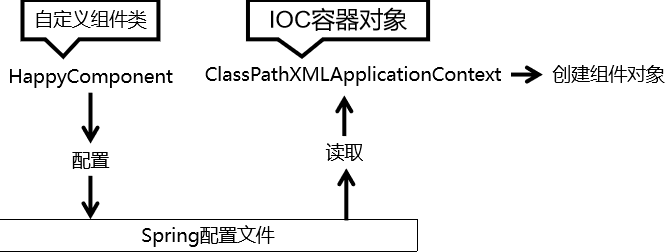
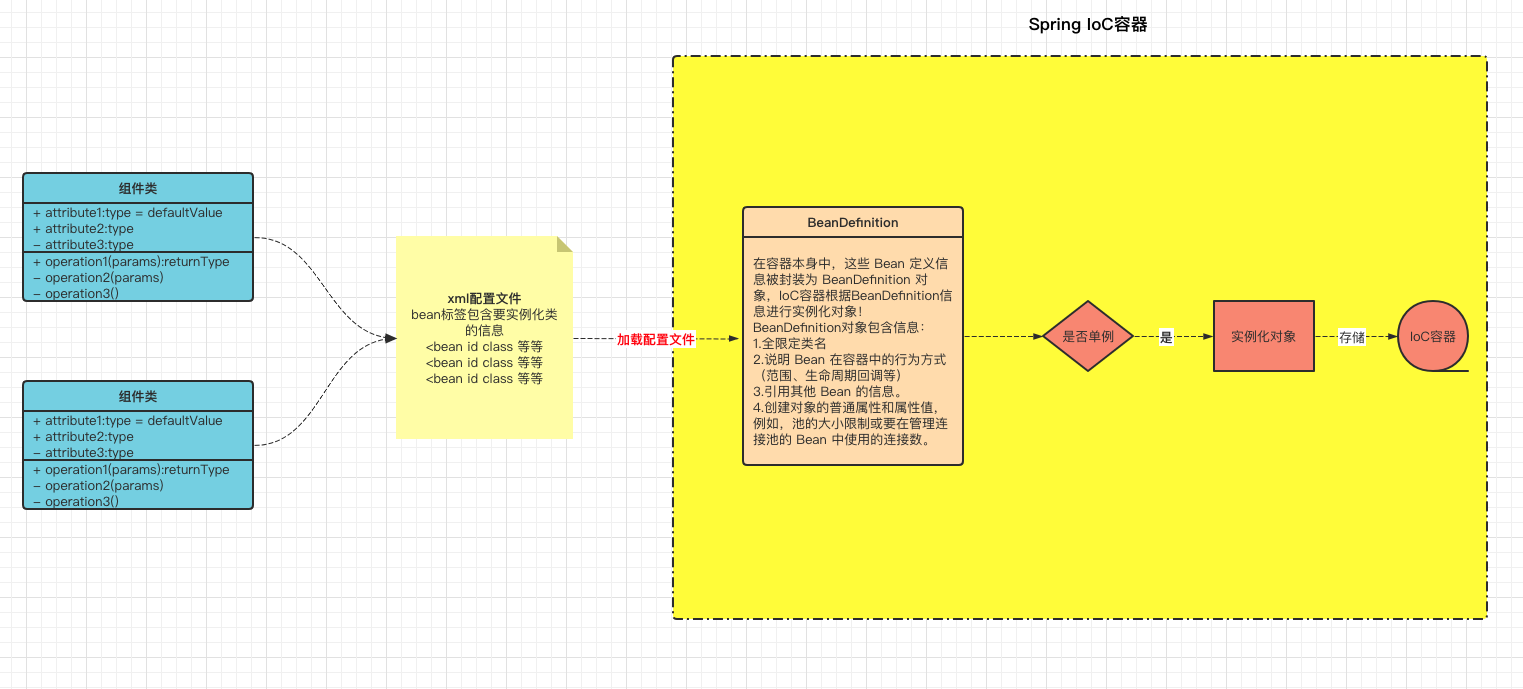
图解IoC配置流程
4.2.2 实验二: 组件(Bean)依赖注入配置(DI)
目标通过配置文件,实现IoC容器中Bean之间的引用(依赖注入DI配置)。主要涉及注入场景:基于构造函数的依赖注入和基于 Setter 的依赖注入。
思路
基于构造函数的依赖注入(单个构造参数)
a.介绍基于构造函数的 DI 是通过容器调用具有多个参数的构造函数来完成的,每个参数表示一个依赖项。下面的示例演示一个只能通过构造函数注入进行依赖项注入的类!
b.准备组件类
1
2
3
4
5
6
7
8
9
10
11
public class UserDao {} public class UserService { private UserDao userDao; public UserService (UserDao userDao) { this .userDao = userDao; } }
c.编写配置文件
文件:resources/spring-02.xml
1 2 3 4 5 6 7 8 9 10 11 12 ```xml <beans > <bean id ="userService" class ="x.y.UserService" > <constructor-arg ref ="userDao" /> </bean > <bean id ="userDao" class ="x.y.UserDao" /> </beans >
1 2 ```plain - constructor-arg标签:可以引用构造参数 ref引用其他bean的标识,value=直接属性值 String name=“二狗”。
基于构造函数的依赖注入(多构造参数解析)
a.介绍基于构造函数的 DI 是通过容器调用具有多个参数的构造函数来完成的,每个参数表示一个依赖项。下面的示例演示通过构造函数注入多个参数,参数包含其他bean和基本数据类型!
b.准备组件类
1
2
3
4
5
6
7
8
9
10
11
12
13
14
15
16
17
public class UserDao {} public class UserService { private UserDao userDao; private int age; private String name; public UserService (int age , String name ,UserDao userDao) { this .userDao = userDao; this .age = age; this .name = name; } }
c.编写配置文件
1 2 3 4 5 6 7 8 9 10 11 12 13 14 <beans > <bean id ="userService" class ="x.y.UserService" > <constructor-arg value ="18" /> <constructor-arg value ="赵伟风" /> <constructor-arg ref ="userDao" /> </bean > <bean id ="userDao" class ="x.y.UserDao" /> </beans >
1 2 3 4 5 6 7 8 9 10 11 12 13 14 15 16 17 18 19 20 21 22 23 24 25 26 27 28 <beans > <bean id ="userService" class ="x.y.UserService" > <constructor-arg name ="name" value ="赵伟风" /> <constructor-arg name ="userDao" ref ="userDao" /> <constructor-arg name ="age" value ="18" /> </bean > <bean id ="userDao" class ="x.y.UserDao" /> </beans > <beans > <bean id ="userService" class ="x.y.UserService" > <constructor-arg index ="1" value ="赵伟风" /> <constructor-arg index ="2" ref ="userDao" /> <constructor-arg index ="0" value ="18" /> </bean > <bean id ="userDao" class ="x.y.UserDao" /> </beans >
1
2
3
4
5
6
7
8
9
10
11
12
13
14
15
16
17
18
19
20
21
22
23
24
25
26
27
28
29
30
31
32
33
34
35
36
37
+ constructor-arg标签:指定构造参数和对应的值 5.**基于Setter方法依赖注入** a.介绍 开发中,除了构造函数注入(DI)更多的使用的Setter方法进行注入! 下面的示例演示一个只能使用纯 setter 注入进行依赖项注入的类。 b.准备组件类 - constructor-arg标签:name属性指定参数名、index属性指定参数角标、value属性指定普通属性值 ```java public Class MovieFinder{ } public class SimpleMovieLister { private MovieFinder movieFinder; private String movieName; public void setMovieFinder(MovieFinder movieFinder) { this.movieFinder = movieFinder; } public void setMovieName(String movieName){ this.movieName = movieName; } // business logic that actually uses the injected MovieFinder is omitted... }
c.编写配置文件
1 2 3 4 5 6 7 8 9 10 11 12 13 14 <bean id ="simpleMovieLister" class ="examples.SimpleMovieLister" > <property name ="movieFinder" ref ="movieFinder" /> <property name ="movieName" value ="消失的她" /> </bean > <bean id ="movieFinder" class ="examples.MovieFinder" />
property标签: 可以给setter方法对应的属性赋值
property 标签: name属性代表set方法标识 、ref代表引用bean的标识id、value属性代表基本属性值
总结:
依赖注入(DI)包含引用类型和基本数据类型,同时注入的方式也有多种!主流的注入方式为setter方法注入和构造函数注入,两种注入语法都需要掌握!
需要特别注意:引用其他bean,使用ref属性。直接注入基本类型值,使用value属性。
4.2.3 实验三: IoC容器创建和使用
介绍
上面的实验只是讲解了如何在XML格式的配置文件编写IoC和DI配置!
如图:
想要配置文件中声明组件类信息真正的进行实例化成Bean对象和形成Bean之间的引用关系,我们需要声明IoC容器对象,读取配置文件,实例化组件和关系维护的过程都是在IoC容器中实现的!
容器实例化
1 2 3 4 5 6 7 8 9 10 11 12 13 ApplicationContext context = new ClassPathXmlApplicationContext ("services.xml" , "daos.xml" ); ApplicationContext context = new ClassPathXmlApplicationContext (); iocContainer1.setConfigLocations("services.xml" , "daos.xml" ); iocContainer1.refresh();
Bean对象读取
1 2 3 4 5 6 7 8 9 10 11 12 13 14 15 16 17 18 19 20 HappyComponent happyComponent = (HappyComponent) iocContainer.getBean("bean的id标识" ); happyComponent.doWork(); HappyComponent happyComponent = iocContainer.getBean(HappyComponent.class);happyComponent.doWork(); HappyComponent happyComponent = iocContainer.getBean("bean的id标识" , HappyComponent.class);happyComponent.doWork(); 根据类型来获取bean时,在满足bean唯一性的前提下,其实只是看:『对象 instanceof 指定的类型』的返回结果, 只要返回的是true 就可以认定为和类型匹配,能够获取到。
4.2.4 实验四: 高级特性:组件(Bean)作用域和周期方法配置
组件周期方法配置
周期方法概念我们可以在组件类中定义方法,然后当IoC容器实例化和销毁组件对象的时候进行调用!这两个方法我们成为生命周期方法!类似于Servlet的init/destroy方法,我们可以在周期方法完成初始化和释放资源等工作。
周期方法声明
1
2
3
4
5
6
7
8
9
10
11
12
13
14
public class BeanOne { public void init () { } } public class BeanTwo { public void cleanup () { } }
1. 周期方法配置
1 2 3 4 5 <beans > <bean id ="beanOne" class ="examples.BeanOne" init-method ="init" /> <bean id ="beanTwo" class ="examples.BeanTwo" destroy-method ="cleanup" /> </beans >
组件作用域配置
Bean作用域概念<bean 标签声明Bean,只是将Bean的信息配置给SpringIoC容器!在IoC容器中,这些<bean标签对应的信息转成Spring内部 BeanDefinition 对象,BeanDefinition 对象内,包含定义的信息(id,class,属性等等)!这意味着,BeanDefinition与类概念一样,SpringIoC容器可以可以根据BeanDefinition对象反射创建多个Bean对象实例。具体创建多少个Bean的实例对象,由Bean的作用域Scope属性指定!
作用域可选值
取值
含义
创建对象的时机
默认值
singleton
在 IOC 容器中,这个 bean 的对象始终为单实例
IOC 容器初始化时
是
prototype
这个 bean 在 IOC 容器中有多个实例
获取 bean 时
否
如果是在WebApplicationContext环境下还会有另外两个作用域(但不常用):
取值
含义
创建对象的时机
默认值
——-
———-
——-
—
request
请求范围内有效的实例
每次请求
否
session
会话范围内有效的实例
每次会话
否
1. 作用域配置配置scope范围
1 2 3 4 5 6 7 8 9 10 11 12 13 14 <bean id ="happyMachine8" scope ="prototype" class ="com.atguigu.ioc.HappyMachine" > <property name ="machineName" value ="happyMachine" /> </bean > <bean id ="happyComponent8" scope ="singleton" class ="com.atguigu.ioc.HappyComponent" > <property name ="componentName" value ="happyComponent" /> </bean >
1. 作用域测试
1
2
3
4
5
6
7
8
9
10
11
12
13
14
@Test public void testExperiment08 () { ApplicationContext iocContainer = new ClassPathXmlApplicationContext ("配置文件名" ); HappyMachine bean = iocContainer.getBean(HappyMachine.class); HappyMachine bean1 = iocContainer.getBean(HappyMachine.class); System.out.println(bean == bean1); HappyComponent bean2 = iocContainer.getBean(HappyComponent.class); HappyComponent bean3 = iocContainer.getBean(HappyComponent.class); System.out.println(bean2 == bean3); }
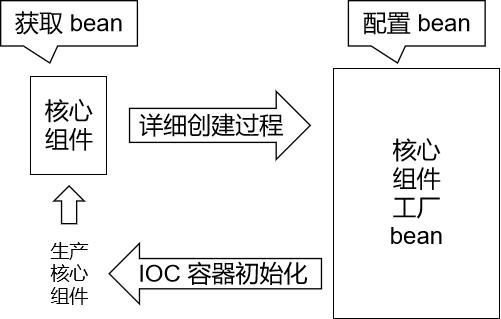
4.2.5 实验五: 高级特性:FactoryBean特性和使用
FactoryBean简介FactoryBean 接口是Spring IoC容器实例化逻辑的可插拔性点。用于配置复杂的Bean对象,可以将创建过程存储在FactoryBean 的getObject方法!FactoryBean<T> 接口提供三种方法:
T getObject(): 返回此工厂创建的对象的实例。该返回值会被存储到IoC容器!boolean isSingleton(): 如果此 FactoryBean 返回单例,则返回 true ,否则返回 false 。此方法的默认实现返回 true (注意,lombok插件使用,可能影响效果)。Class<?> getObjectType(): 返回 getObject() 方法返回的对象类型,如果事先不知道类型,则返回 null 。
FactoryBean使用场景
代理类的创建
第三方框架整合
复杂对象实例化等
Factorybean应用
准备FactoryBean实现类
1 2 3 4 5 6 7 8 9 10 11 12 13 14 15 16 17 18 19 20 21 22 23 24 25 26 27 28 29 30 31 32 public class HappyFactoryBean implements FactoryBean <HappyMachine> { private String machineName; public String getMachineName () { return machineName; } public void setMachineName (String machineName) { this .machineName = machineName; } @Override public HappyMachine getObject () throws Exception { HappyMachine happyMachine = new HappyMachine (); happyMachine.setMachineName(this .machineName); return happyMachine; } @Override public Class<?> getObjectType() { return HappyMachine.class; } }
1. 配置FactoryBean实现类
1 2 3 4 5 6 7 <bean id ="happyMachine7" class ="com.atguigu.ioc.HappyFactoryBean" > <property name ="machineName" value ="iceCreamMachine" /> </bean >
1. 测试读取FactoryBean和FactoryBean.getObject对象
1
2
3
4
5
6
7
8
9
10
11
12
13
@Test public void testExperiment07 () { ApplicationContext iocContainer = new ClassPathXmlApplicationContext ("spring-bean-07.xml" ); HappyMachine happyMachine = iocContainer.getBean("happyMachine7" ,HappyMachine.class); System.out.println("happyMachine = " + happyMachine); Object bean = iocContainer.getBean("&happyMachine7" ); System.out.println("bean = " + bean); }
FactoryBean和BeanFactory区别
**FactoryBean **是 Spring 中一种特殊的 bean,可以在 getObject() 工厂方法自定义的逻辑创建Bean!是一种能够生产其他 Bean 的 Bean。FactoryBean 在容器启动时被创建,而在实际使用时则是通过调用 getObject() 方法来得到其所生产的 Bean。因此,FactoryBean 可以自定义任何所需的初始化逻辑,生产出一些定制化的 bean。
一般情况下,整合第三方框架,都是通过定义FactoryBean实现!!!
BeanFactory 是 Spring 框架的基础,其作为一个顶级接口定义了容器的基本行为,例如管理 bean 的生命周期、配置文件的加载和解析、bean 的装配和依赖注入等。BeanFactory 接口提供了访问 bean 的方式,例如 getBean() 方法获取指定的 bean 实例。它可以从不同的来源(例如 Mysql 数据库、XML 文件、Java 配置类等)获取 bean 定义,并将其转换为 bean 实例。同时,BeanFactory 还包含很多子类(例如,ApplicationContext 接口)提供了额外的强大功能。
总的来说,FactoryBean 和 BeanFactory 的区别主要在于前者是用于创建 bean 的接口,它提供了更加灵活的初始化定制功能,而后者是用于管理 bean 的框架基础接口,提供了基本的容器功能和 bean 生命周期管理。
4.2.6 实验六: 基于XML方式整合三层架构组件
需求分析搭建一个三层架构案例,模拟查询全部学生(学生表)信息,持久层使用JdbcTemplate和Druid技术,使用XML方式进行组件管理!
数据库准备
1
2
3
4
5
6
7
8
9
10
11
12
13
14
15
16
17
18
19
20
21
22
23
create database studb; use studb; CREATE TABLE students ( id INT PRIMARY KEY, name VARCHAR(50 ) NOT NULL, gender VARCHAR (10 ) NOT NULL, age INT, class VARCHAR (50 ) ); INSERT INTO students (id, name, gender, age, class) VALUES (1 , '张三' , '男' , 20 , '高中一班' ), (2 , '李四' , '男' , 19 , '高中二班' ), (3 , '王五' , '女' , 18 , '高中一班' ), (4 , '赵六' , '女' , 20 , '高中三班' ), (5 , '刘七' , '男' , 19 , '高中二班' ), (6 , '陈八' , '女' , 18 , '高中一班' ), (7 , '杨九' , '男' , 20 , '高中三班' ), (8 , '吴十' , '男' , 19 , '高中二班' );
项目准备
项目创建spring-xml-practice-02
依赖导入
1 2 3 4 5 6 7 8 9 10 11 12 13 14 15 16 17 18 19 20 21 22 23 24 25 26 27 28 29 30 31 32 33 34 35 36 37 38 39 40 41 42 43 44 45 46 <dependencies > <dependency > <groupId > org.springframework</groupId > <artifactId > spring-context</artifactId > <version > 6.0.6</version > </dependency > <dependency > <groupId > mysql</groupId > <artifactId > mysql-connector-java</artifactId > <version > 8.0.25</version > </dependency > <dependency > <groupId > com.alibaba</groupId > <artifactId > druid</artifactId > <version > 1.2.8</version > </dependency > <dependency > <groupId > org.springframework</groupId > <artifactId > spring-jdbc</artifactId > <version > 6.0.6</version > </dependency > </dependencies >
1. 实体类准备
1
2
3
4
5
6
7
8
9
10
11
12
13
14
15
16
17
18
19
20
21
22
23
24
25
26
27
28
29
30
31
32
33
34
35
36
37
38
39
40
41
42
43
44
45
46
47
48
49
50
51
52
53
54
55
56
57
58
59
60
public class Student { private Integer id; private String name; private String gender; private Integer age; private String classes; public Integer getId () { return id; } public void setId (Integer id) { this .id = id; } public String getName () { return name; } public void setName (String name) { this .name = name; } public String getGender () { return gender; } public void setGender (String gender) { this .gender = gender; } public Integer getAge () { return age; } public void setAge (Integer age) { this .age = age; } public String getClasses () { return classes; } public void setClasses (String classes) { this .classes = classes; } @Override public String toString () { return "Student{" + "id=" + id + ", name='" + name + '\'' + ", gender='" + gender + '\'' + ", age=" + age + ", classes='" + classes + '\'' + '}' ; } }
4.JdbcTemplate技术讲解
为了在特定领域帮助我们简化代码,Spring 封装了很多 『Template』形式的模板类。例如:RedisTemplate、RestTemplate 等等,包括我们今天要学习的 JdbcTemplate。
1
2
3
4
atguigu.url=jdbc:mysql://localhost:3306/studb atguigu.driver=com.mysql.cj.jdbc.Driver atguigu.username=root atguigu.password=root
springioc配置文件
1
2
3
4
5
6
7
8
9
10
11
12
13
14
15
16
17
18
19
20
21
22
23
24
25
26
27
<?xml version="1.0" encoding="UTF-8" ?> <beans xmlns ="http://www.springframework.org/schema/beans" xmlns:xsi ="http://www.w3.org/2001/XMLSchema-instance" xmlns:context ="http://www.springframework.org/schema/context" xsi:schemaLocation ="http://www.springframework.org/schema/beans http://www.springframework.org/schema/beans/spring-beans.xsd http://www.springframework.org/schema/context https://www.springframework.org/schema/context/spring-context.xsd" > <context:property-placeholder location ="classpath:jdbc.properties" /> <bean id ="druidDataSource" class ="com.alibaba.druid.pool.DruidDataSource" > <property name ="url" value ="${atguigu.url}" /> <property name ="driverClassName" value ="${atguigu.driver}" /> <property name ="username" value ="${atguigu.username}" /> <property name ="password" value ="${atguigu.password}" /> </bean > <bean id ="jdbcTemplate" class ="org.springframework.jdbc.core.JdbcTemplate" > <property name ="dataSource" ref ="druidDataSource" /> </bean > </beans >
基于jdbcTemplate的CRUD使用
1
2
3
4
5
6
7
8
9
10
11
12
13
14
15
16
17
18
19
20
21
22
23
24
25
26
27
28
29
30
31
32
33
34
35
36
37
38
39
40
41
42
43
44
45
46
47
48
49
50
51
52
53
54
55
56
57
58
59
60
61
62
63
64
65
66
67
68
69
70
71
72
73
74
75
76
77
78
79
80
public class JdbcTemplateTest { @Test public void testDML () { ApplicationContext applicationContext = new ClassPathXmlApplicationContext ("spring-ioc.xml" ); JdbcTemplate jdbcTemplate = applicationContext.getBean(JdbcTemplate.class); String sql = "insert into students (id,name,gender,age,class) values (?,?,?,?,?);" ; int rows = jdbcTemplate.update(sql, 9 ,"十一" , "男" , 18 , "二年三班" ); System.out.println("rows = " + rows); } @Test public void testDQLForPojo () { String sql = "select id , name , age , gender , class as classes from students where id = ? ;" ; ApplicationContext applicationContext = new ClassPathXmlApplicationContext ("spring-ioc.xml" ); JdbcTemplate jdbcTemplate = applicationContext.getBean(JdbcTemplate.class); Student student = jdbcTemplate.queryForObject(sql, (rs, rowNum) -> { Student stu = new Student (); stu.setId(rs.getInt("id" )); stu.setName(rs.getString("name" )); stu.setAge(rs.getInt("age" )); stu.setGender(rs.getString("gender" )); stu.setClasses(rs.getString("classes" )); return stu; }, 2 ); System.out.println("student = " + student); } @Test public void testDQLForListPojo () { String sql = "select id , name , age , gender , class as classes from students ;" ; ApplicationContext applicationContext = new ClassPathXmlApplicationContext ("spring-ioc.xml" ); JdbcTemplate jdbcTemplate = applicationContext.getBean(JdbcTemplate.class); List<Student> studentList = jdbcTemplate.query(sql, new BeanPropertyRowMapper <>(Student.class)); System.out.println("studentList = " + studentList); } }
5.三层架构搭建和实现
1. 持久层
1 2 3 4 5 6 7 8 9 10 11 12 13 14 15 16 17 18 19 20 21 22 23 24 25 26 27 28 29 30 31 32 33 34 35 36 37 38 public interface StudentDao { List<Student> queryAll () ; } public class StudentDaoImpl implements StudentDao { private JdbcTemplate jdbcTemplate; public void setJdbcTemplate (JdbcTemplate jdbcTemplate) { this .jdbcTemplate = jdbcTemplate; } @Override public List<Student> queryAll () { String sql = "select id , name , age , gender , class as classes from students ;" ; List<Student> studentList = jdbcTemplate.query(sql, new BeanPropertyRowMapper <>(Student.class)); return studentList; } }
1. 业务层
1 2 3 4 5 6 7 8 9 10 11 12 13 14 15 16 17 18 19 20 21 22 23 24 25 26 27 28 29 30 31 32 33 public interface StudentService { List<Student> findAll () ; } public class StudentServiceImpl implements StudentService { private StudentDao studentDao; public void setStudentDao (StudentDao studentDao) { this .studentDao = studentDao; } @Override public List<Student> findAll () { List<Student> studentList = studentDao.queryAll(); return studentList; } }
1. 表述层
1
2
3
4
5
6
7
8
9
10
11
12
13
public class StudentController { private StudentService studentService; public void setStudentService (StudentService studentService) { this .studentService = studentService; } public void findAll () { List<Student> studentList = studentService.findAll(); System.out.println("studentList = " + studentList); } }
6.三层架构IoC配置
1
2
3
4
5
6
7
8
9
10
11
12
13
14
15
16
17
18
19
20
21
22
23
24
25
26
27
28
29
30
31
32
33
34
35
36
37
38
39
40
41
42
<?xml version="1.0" encoding="UTF-8" ?> <beans xmlns ="http://www.springframework.org/schema/beans" xmlns:xsi ="http://www.w3.org/2001/XMLSchema-instance" xmlns:context ="http://www.springframework.org/schema/context" xsi:schemaLocation ="http://www.springframework.org/schema/beans http://www.springframework.org/schema/beans/spring-beans.xsd http://www.springframework.org/schema/context https://www.springframework.org/schema/context/spring-context.xsd" > <context:property-placeholder location ="classpath:jdbc.properties" /> <bean id ="druidDataSource" class ="com.alibaba.druid.pool.DruidDataSource" > <property name ="url" value ="${atguigu.url}" /> <property name ="driverClassName" value ="${atguigu.driver}" /> <property name ="username" value ="${atguigu.username}" /> <property name ="password" value ="${atguigu.password}" /> </bean > <bean id ="jdbcTemplate" class ="org.springframework.jdbc.core.JdbcTemplate" > <property name ="dataSource" ref ="druidDataSource" /> </bean > <bean id ="studentDao" class ="com.atguigu.dao.impl.StudentDaoImpl" > <property name ="jdbcTemplate" ref ="jdbcTemplate" /> </bean > <bean id ="studentService" class ="com.atguigu.service.impl.StudentServiceImpl" > <property name ="studentDao" ref ="studentDao" /> </bean > <bean id ="studentController" class ="com.atguigu.controller.StudentController" > <property name ="studentService" ref ="studentService" /> </bean > </beans >
7.运行测试
1
2
3
4
5
6
7
8
9
10
public class ControllerTest { @Test public void testRun () { ApplicationContext applicationContext = new ClassPathXmlApplicationContext ("spring-ioc.xml" ); StudentController studentController = applicationContext.getBean(StudentController.class); studentController.findAll(); } }
XMLIoC方式问题总结
注入的属性必须添加setter方法、代码结构乱!
配置文件和Java代码分离、编写不是很方便!
XML配置文件解析效率低
整合测试环境作用好处1:不需要自己创建IOC容器对象了好处2:任何需要的bean都可以在测试类中直接享受自动装配
导入相关依赖
1 2 3 4 5 6 7 8 9 10 11 12 13 14 15 16 17 18 19 20 21 <dependency > <groupId > org.junit.jupiter</groupId > <artifactId > junit-jupiter-api</artifactId > <version > 5.3.1</version > </dependency > <dependency > <groupId > org.springframework</groupId > <artifactId > spring-test</artifactId > <version > 6.0.6</version > <scope > test</scope > </dependency >
整合测试注解使用
1 2 3 4 5 6 7 8 9 10 11 12 @SpringJUnitConfig(value = {BeanConfig.class}) public class Junit5IntegrationTest { @Autowired private User user; @Test public void testJunit5 () { System.out.println(user); } }